Showing posts with label Fun. Show all posts

Wednesday, May 15, 2013

24 days till the Mitzvah!

I'm getting so excited and it isn't even my party. :)) Here are a few updates. Sorry for the repeats. We are nailing down final details and I'm trying to not add on too many extras.


Monday, April 22, 2013

9!

Holy Smokes! The munchkin is now 9! We celebrated her birthday at the rock climbing center. She had a great day and all of her special people were there to help her celebrate. Here are a few details from her party.
This one isn't birthday related but it is kiddo and fun related. I made this cute paper parasol arrangement for her room for a little spring fun.


Friday, April 19, 2013

OT Goodies

When Pinterest meets work... I have a lot of kiddos with sensory processing deficits so I made these lap buddies for my little pals. I was at Big Lots and found these super fun socks (that only I would wear!) I filled them with rice and then stitched them closed. They don't look very long in the photo but they are a women's crew length so they cover the whole lap and give the kids the input that they need to be able to attend to their work. Plus they all love having a little "helper."


I also made these action sticks for when we need a break. Most of my children have goals to attend to a task for x amount of minutes. I don't know about you, but even I have difficulty attending for 20 minutes. I blame it on my iPhone! ;) I found this cute metal watering can at the Dollar Tree. I printed, cut, and laminated the little circles and glued them to foam craft sticks. The kids love acting out the silly actions for a special treat.


Wednesday, December 12, 2012

It's a Bird!

Dusting this badboy off... Sorry for the neglect, friend. Life takes over and before you know it you have no energy left for blogging. I did get a little crafting in last week. The wifey and I got invited to two(!) white elephant parties. I saw this Flamingo on Pinterest and being a person who loves to glue things to things, I knew I had to try it. So simple. I ordered a 2-pack of flamingos on amazon.com. I'm going to do a charity craft sale this spring and I saw Walmart and Lowes have whole flocks of flamingos for pretty cheap so that may be the best way to go. Without further ado, I present my bird.


Linking up to: I Heart Naptime . My 1929 Charmer . Craft-o-Maniac . Making the Scene . Making the World Cuter . Sewing Barefoot . Ninth Street Notions . The Dedicated House . Mad In Crafts . DIY Showoff . Brassy Apple . Homemaker On a Dime . Not Just A Housewife . My Uncommon Slice of Suburbia . Sugar Bee Crafts . Mercy Ink Blog . VWB Blog . Home Stories A to Z . The Winthrop Chronicles . Just Us Four . Sugar and Dots . Gingersnap Crafts . Someday Crafts . White Lights on Wednesday . The Well Crafted Home . Fine Craft Guild . The Gunny Sack . House of Hepworths . A Glimpse Inside . Two Yellow Birds . 30 Handmade Days . The Shabby Nest . Naptime Crafters . Whipper Berries .

Wednesday, December 5, 2012

Felted Cat Hair

Warning: Potentially creepy post ahead. ;)

I'm just gonna say it. I felted my cats. Well, I got this book for my birthday called Crafting With Cats and I immediately felt compelled to give one of the tutorials a try. I had no idea cat hair would felt! And it's a free endless resource at my house. Or so I thought. Now I brush my cats 2x daily and they just aren't giving it up. I'm not exactly sure what this felting idea will turn into. I've been thinking about making cat toys out of them but I'm not sure how well they will hold up. I'll give it a try. But for now, the moment you're all waiting for...photos.

This is her happy face. lol Brush, vacuum, repeat. Cut out a cardboard kitty template and cover it in packing tape so it keeps its shape when it gets wet.

Wrap your cardboard kitty many times in kitty fur and then put a little soap on the fur, soak in hot water and then wrap with saran wrap. Use your fingers to gently rub the materials. I'd say 5 minutes is good. Check every now and then to make sure your fur is in place. Be sure your ears are pointy! Unwrap and dry. I was dying to see what it looked like so I put the iron on it a few times to dry.

Now your kitty is flat and has stray hairs all over it. I trimmed those with the scissors. Next, cut the bottom almost all the way off and fold that little strip over to make a tail. You'll see what I mean in the next photo.

 I don't have beads handy for the eyes but I tied a cute little bow around her neck.

Kitty cat finger puppet is complete.


Linking up to: I Heart Naptime . My 1929 Charmer . Craft-o-Maniac . Making the Scene . Making the World Cuter . Sewing Barefoot . Ninth Street Notions . The Dedicated House . Mad In Crafts . DIY Showoff . Brassy Apple . Homemaker On a Dime . Not Just A Housewife . My Uncommon Slice of Suburbia . Sugar Bee Crafts . Mercy Ink Blog . VWB Blog . Home Stories A to Z . The Winthrop Chronicles . Just Us Four . Sugar and Dots . Gingersnap Crafts . Someday Crafts . White Lights on Wednesday . The Well Crafted Home . Fine Craft Guild . The Gunny Sack . House of Hepworths . A Glimpse Inside . Two Yellow Birds . 30 Handmade Days . The Shabby Nest . Naptime Crafters . Whipper Berries .

Monday, November 26, 2012

Very Grinchy Christmas


 This was a crazy idea... it might work as a whole. I traced a picture of the Grinch on plain white paper then tore tiny pieces of paper, tissue paper, and cotton balls to cover it. I made a frame using an old cardboard box and covered it in green duct tape. I need a little work on my scissor skills. lol Must fix that straight edge, now!


Friday, November 23, 2012

2012: Year In Review


Holy Smokes! They are here! They are here!! I've been working on these bad boys for what feels like forever. One day, I had enough and I ordered them. I ordered them from vistaprint.com because they have the best prices, really. I'll be honest, I'm a wee bit disappointed in the color quality because I previewed and previewed and tweaked till they were perfect. *breathe* It's not the end of the world. What do you think? Oh, and as always, my family's names and face are blurred. I promise they are adorable. ;)


Thursday, November 22, 2012

Seuss Felt Stockings


Okay, so I didn't recycle these. But they only cost .60 each. That's fair, right? We are celebrating Christmas at my inlaws so we are taking our massive tree with us. (Whew!) Does anyone else start to feel a little claustrophobic with a huge tree in the house? This year we are putting up a few small trees and keeping it simple. We couldn't have maroon stockings to go with our theme so I whipped up some quick felt stockings, and by quick, I mean quick. I hot-glued these. :X Is that a sin? It should be. I've been known to hot glue costumes together while wearing them.  I traced some stocking printables and cut the shapes out and made another piece for the backing. I think they are kinda cute.


Tuesday, November 20, 2012

Recycled Reindeer


I saw this Reindeer on BHG and fell in love...only I needed mine to be on drugs or something. I feel really bad when I buy new decorations because I have...so...much...stuff. But making them from items I already have is totally acceptable. The tutorial is on BHG.com so I won't reinvent the wheel. It's perfect. Cut, decorate, glue.


I cut too many of the U shaped pieces (only need one).


A little scrapbook paper and modge podge. 


The original:


Monday, November 19, 2012

State Pin Art


 There you have it, I'm an Arkansan. To be honest, I absolutely love Arkansas. I was talking with some people this weekend who are transports to the state who can't find anything to love here. I think it is what you make it. I can't seem to find enough time to do all of the things I want to do. I've been hoarding this idea that I saw here months ago. I purchased the supplies but never found time to complete it. It requires a lot of hammering of nails, and once you get those nails hammered, it loosens up all of the nails that you've already hammered...and once you wrap those nails, they get looser...and then you re-hammer those nails again. Endless loop of getting angry/getting your anger out. ha. It was definitely a fun project. I think my little one will be able to make one of these with some help. My wife talks about all of the cool things her dad taught her to do when she was little and I joke that my dad gave me a hammer, a board, and a hand full of nails and told me to keep busy. ;) I can't tell you why I chose these colors, looking at the photo all I can think is "why did I choose those colors?" I guess they just spoke to me. I printed an outline of the state and cut it out and then hammered my nails around the perimeter. I free-handed the heart, which is never a good idea. The tutorial I read said to be sure and use as many nails as possible for the heart, I didn't. It would have looked a lot better if I did. Note to self, listen. I think that's about it. Not bad for a quick gift.


Wednesday, November 14, 2012

Sharpie Cookie Plate


First! Okay...this is maybe a little too embarrassing and I shouldn't post it but I'm so excited to make one of these so who cares, right? I'm so so so in love with these plates on etsy, but not in love with the price.  Bakey-Bakey? I probably shouldn't post this but we are firm believers in dessert. We have it every night. Most days we are so lazy that we just put some pre-made cookies in the toaster oven...hence "bakey-bakey."

 Before: Plain white plate from the Dollar Tree. Write, draw, scribble on the plate with a Sharpie. Feel free to doodle as much as you want because you can wipe it off if you made a mistake. Really, you can. I was so afraid! I put a little hand sanitizer, because it's always handy (pun intended) on my plate and started over a few times. To finish it off, place it in the oven for 30 minutes on 350 and enjoy!


Monday, November 12, 2012

Moroccan Theme Party Invitations


Hey guys. I know it says age 29 over there but it won't be that way for long. 22 days till the big Three-Oh! Let's breathe together. ;) The only thing keeping me sane right now is birthday party planning. What kind of party you ask? Oh, it's a Bollywood Murder Mystery party. I couldn't settle on a theme. I wanted a theme party with costumes and I especially wanted one where I can wear something crazy fun and...my favorite game is Clue and I saw a Living Social for a murder mystery party so I bought it. Of course the party was "Murder in Hollywood" and now it's "Murder in Bollywood." All names changed to protect the innocent. I'm having so much fun planning this party, I've got so many projects in the works and I'll be sure to post them here. First, my invitations...

 I used two gold foil doilies of different sizes for the medallion and made a bellyband with a gold ribbon to wrap around the invitation.


Tuesday, November 6, 2012

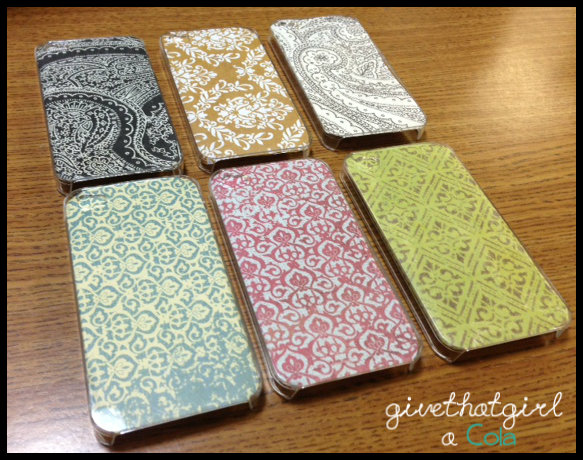
DIY Interchangeable Iphone Cases

I've seen this idea floating around and I've wanted to make these for a long time. Unfortunately, I just got the new Iphone 5 so my friends will have to enjoy them without me. I ordered the cases on ebay for $1 each and used scrapbook paper that I already owned. I made a total of 7 cases with 6 interchangeable papers. 

Supplies: Pencil, Clear Iphone case, Scissors, and paper of your choosing.
Each case will come with 6 different interchangeable paper covers.

 
Lastly, use an exacto knife to cut out the camera hole. I don't have one handy for the finished photo.


Friday, November 2, 2012

DIY Felt Heart Hand Warmies


How cute are these? I love to keep these handy in the mornings for the little one. They are so quick and easy to make. I'm always looking for beginner sewing projects to do. I don't think I mentioned before but I'm an Occupational Therapist. Last year I had some of my older students working on fine motor skills with stitching these warmers up. I found this idea on Etsy. I decided to make mine bright fun colors with wool felt. They don't stay warm for too long but definitely long enough to get to school. I chose to fill mine with rice and little lavender petals for a little scent.


Thursday, November 1, 2012

Fall Yarn Letters

 
 I'm almost too embarrassed to post these on here because they were so simple (and free!). Everyone has those wooden letters from craft stores and you could spend a small fortune buying up the alphabet. It dawned on me one day that I can make my own. I have yarn out the wahzoo (Did I spell that right? Is it even a word?) I cut letters out of amazon boxes at 12" tall and covered one side with glue. Then I wrapped yarn back and forth until the entire letter was covered. To keep the yarn in place while drying, I attached a paper clip. And that's it! Next time I'll aim for cutting straighter lines. ;) I consider these to be very abstract or freeform.


Sunday, October 28, 2012

Fall Fun Frame


Pardon the dorky alliteration... I just couldn't resist. My daughter and I had a great time making these acorn photo frames, inspired by the BHG acorn frame. We are fortunate (ha!) to live on a street lined with oak trees so there were many acorn caps to choose from.

You will need: Elmer's glue, acorn caps in various sizes, and a frame (We got ours at the Dollar Store)


Related Posts Plugin for WordPress, Blogger...
}