My good buddy saved up copy paper boxes for a long time to help me make my setup. I put duct tape around all of the edges to add stability. I ended up covering each shelf with moss that I had from moss table runners from my wedding. While it added a nice effect, all of my items had moss clinging to them. ;) Overall, I was pretty happy with how everything turned out. I did the best that I could. I was proud of all of my items and felt like I prepared the best that I could. If I ever did this sort of thing again, I'd be sure to bring something to work on as it gets boring and I get nervous when people are shopping at my booth.
Showing posts with label Craft. Show all posts
Wednesday, April 17, 2013
Craft Sale
Hey guys! I can't believe it has been over a month since my last visit here. I have had a busy time at work lately with my annual conferences and family time has kept me occupied as well. Last month was the Lucie's Place craft event where I sold some of my items.
My good buddy saved up copy paper boxes for a long time to help me make my setup. I put duct tape around all of the edges to add stability. I ended up covering each shelf with moss that I had from moss table runners from my wedding. While it added a nice effect, all of my items had moss clinging to them. ;) Overall, I was pretty happy with how everything turned out. I did the best that I could. I was proud of all of my items and felt like I prepared the best that I could. If I ever did this sort of thing again, I'd be sure to bring something to work on as it gets boring and I get nervous when people are shopping at my booth.
Wednesday, December 5, 2012
Felted Cat Hair
Warning: Potentially creepy post ahead. ;)
I'm just gonna say it. I felted my cats. Well, I got this book for my birthday called Crafting With Cats and I immediately felt compelled to give one of the tutorials a try. I had no idea cat hair would felt! And it's a free endless resource at my house. Or so I thought. Now I brush my cats 2x daily and they just aren't giving it up. I'm not exactly sure what this felting idea will turn into. I've been thinking about making cat toys out of them but I'm not sure how well they will hold up. I'll give it a try. But for now, the moment you're all waiting for...photos.
This is her happy face. lol Brush, vacuum, repeat. Cut out a cardboard kitty template and cover it in packing tape so it keeps its shape when it gets wet.
Wrap your cardboard kitty many times in kitty fur and then put a little soap on the fur, soak in hot water and then wrap with saran wrap. Use your fingers to gently rub the materials. I'd say 5 minutes is good. Check every now and then to make sure your fur is in place. Be sure your ears are pointy! Unwrap and dry. I was dying to see what it looked like so I put the iron on it a few times to dry.
Now your kitty is flat and has stray hairs all over it. I trimmed those with the scissors. Next, cut the bottom almost all the way off and fold that little strip over to make a tail. You'll see what I mean in the next photo.
I don't have beads handy for the eyes but I tied a cute little bow around her neck.
Kitty cat finger puppet is complete.
Linking up to: I Heart Naptime . My 1929 Charmer . Craft-o-Maniac . Making the Scene . Making the World Cuter . Sewing Barefoot . Ninth Street Notions . The Dedicated House . Mad In Crafts . DIY Showoff . Brassy Apple . Homemaker On a Dime . Not Just A Housewife . My Uncommon Slice of Suburbia . Sugar Bee Crafts . Mercy Ink Blog . VWB Blog . Home Stories A to Z . The Winthrop Chronicles . Just Us Four . Sugar and Dots . Gingersnap Crafts . Someday Crafts . White Lights on Wednesday . The Well Crafted Home . Fine Craft Guild . The Gunny Sack . House of Hepworths . A Glimpse Inside . Two Yellow Birds . 30 Handmade Days . The Shabby Nest . Naptime Crafters . Whipper Berries .
I'm just gonna say it. I felted my cats. Well, I got this book for my birthday called Crafting With Cats and I immediately felt compelled to give one of the tutorials a try. I had no idea cat hair would felt! And it's a free endless resource at my house. Or so I thought. Now I brush my cats 2x daily and they just aren't giving it up. I'm not exactly sure what this felting idea will turn into. I've been thinking about making cat toys out of them but I'm not sure how well they will hold up. I'll give it a try. But for now, the moment you're all waiting for...photos.
This is her happy face. lol Brush, vacuum, repeat. Cut out a cardboard kitty template and cover it in packing tape so it keeps its shape when it gets wet.
Now your kitty is flat and has stray hairs all over it. I trimmed those with the scissors. Next, cut the bottom almost all the way off and fold that little strip over to make a tail. You'll see what I mean in the next photo.
I don't have beads handy for the eyes but I tied a cute little bow around her neck.
Kitty cat finger puppet is complete.
Linking up to: I Heart Naptime . My 1929 Charmer . Craft-o-Maniac . Making the Scene . Making the World Cuter . Sewing Barefoot . Ninth Street Notions . The Dedicated House . Mad In Crafts . DIY Showoff . Brassy Apple . Homemaker On a Dime . Not Just A Housewife . My Uncommon Slice of Suburbia . Sugar Bee Crafts . Mercy Ink Blog . VWB Blog . Home Stories A to Z . The Winthrop Chronicles . Just Us Four . Sugar and Dots . Gingersnap Crafts . Someday Crafts . White Lights on Wednesday . The Well Crafted Home . Fine Craft Guild . The Gunny Sack . House of Hepworths . A Glimpse Inside . Two Yellow Birds . 30 Handmade Days . The Shabby Nest . Naptime Crafters . Whipper Berries .
Monday, December 3, 2012
Christmas Cheer
I just finished my next to last piece for my Seussical Mantel! I altered this printable from Inviting Printables (the pink letters were red) and mounted it on two pieces of poster board. I think I will still need to attach it to something sturdy (i.e. Amazon.com boxes) to make it stand up right.
Friday, November 30, 2012
So close to 30, I can taste it!
Sooo, my very best friend from Junior High School wanted to get me a cake for my birthday. I can't wait to see what it looks like. I've been coveting those blingy cake numbers that I see all over Pinterest for months now so I made my own. Big improvement!
Linking up to: I Heart Naptime . My 1929 Charmer . Craft-o-Maniac . Making the Scene . Making the World Cuter . Sewing Barefoot . Ninth Street Notions . The Dedicated House . Mad In Crafts . DIY Showoff . Brassy Apple . Homemaker On a Dime . Not Just A Housewife . My Uncommon Slice of Suburbia . Sugar Bee Crafts . Mercy Ink Blog . VWB Blog . Home Stories A to Z . The Winthrop Chronicles . Just Us Four . Sugar and Dots . Gingersnap Crafts . Someday Crafts . White Lights on Wednesday . The Well Crafted Home . Fine Craft Guild . The Gunny Sack . House of Hepworths . A Glimpse Inside . Two Yellow Birds . 30 Handmade Days . The Shabby Nest . Naptime Crafters . Whipper Berries .
Wednesday, November 28, 2012
d.i.y. branch tree
That d*mn tree branch isn't going to scratch me anymore! For the past few months, I've been running into a low hanging branch on my way to the compost bin. I was in desperate need of a nice limb for my buffet table decor so it had to go. I spray painted it gold and hung mini ornaments from it. What do you think? Kortney=1 Evil Branch=0.
Friday, November 23, 2012
2012: Year In Review
Holy Smokes! They are here! They are here!! I've been working on these bad boys for what feels like forever. One day, I had enough and I ordered them. I ordered them from vistaprint.com because they have the best prices, really. I'll be honest, I'm a wee bit disappointed in the color quality because I previewed and previewed and tweaked till they were perfect. *breathe* It's not the end of the world. What do you think? Oh, and as always, my family's names and face are blurred. I promise they are adorable. ;)
Tuesday, November 20, 2012
Recycled Reindeer
I saw this Reindeer on BHG and fell in love...only I needed mine to be on drugs or something. I feel really bad when I buy new decorations because I have...so...much...stuff. But making them from items I already have is totally acceptable. The tutorial is on BHG.com so I won't reinvent the wheel. It's perfect. Cut, decorate, glue.
I cut too many of the U shaped pieces (only need one).
A little scrapbook paper and modge podge.
The original:
Tuesday, November 13, 2012
Copper Garden Ball
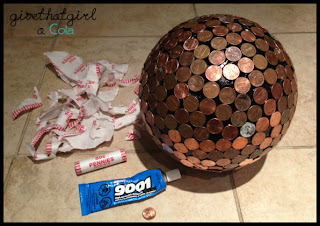
Disclaimer: This isn't a tutorial, more like a what not to do entry. I've wanted to make one of these for a long long time, and really how hard can gluing some pennies to a bowling ball be? I almost lost my mind! First of all, finding bowling balls isn't as easy as one would expect but I did hit the jackpot at Savers...for $9.99 each. This better be good! I got $5 worth of pennies at the bank and some gorilla glue...which doesn't dry clear. In fact, it goes on clear but then becomes 3x its size and turns white. I covered 1/5 of the ball with pennies glued in this before it dried and I realized what I had done. The other thing I should mention is, before the pennies dry they really want to slide off of this spherical surface. I don't have an answer to this. After the first pennies dried, I was able to start adding and the first pennies became a boundary so nothing could slide past them. I'm not sure if that makes sense, but if you make this ball, you'll quickly understand what I mean. Also, you will note from the photos below that at one point during this process I wore gloves. Am I the only person out there who can't use their hands at all when wearing gloves??! Needless to say, I might get cancer from carcinogenic adhesives. OH, the glue that I found and loved is 9001. I got it at Hobby Lobby and I can't tell you the price because my lazy (but kind) cashier just picked one out of her head when it didn't have a sticker on it. What did I do with the white glue catastrophe, you ask? I did what anyone else would do and I Sharpied it! I'm attaching a photo/link at the bottom of my inspiration ball. When the ball sits in the rain it will patina and look super cool. This ball is for my father in law's 70th birthday. What else to get a rich old Jewish man? Money!
* Inspiration ball from Beth Evans Ramos
Monday, November 12, 2012
Moroccan Theme Party Invitations
I used two gold foil doilies of different sizes for the medallion and made a bellyband with a gold ribbon to wrap around the invitation.
Friday, November 2, 2012
DIY Felt Heart Hand Warmies
How cute are these? I love to keep these handy in the mornings for the little one. They are so quick and easy to make. I'm always looking for beginner sewing projects to do. I don't think I mentioned before but I'm an Occupational Therapist. Last year I had some of my older students working on fine motor skills with stitching these warmers up. I found this idea on Etsy. I decided to make mine bright fun colors with wool felt. They don't stay warm for too long but definitely long enough to get to school. I chose to fill mine with rice and little lavender petals for a little scent.
DIY Lace Cuff Bracelet
I can't remember where I first saw this idea. I love anything with lace so a simple lace cuff bracelet is a must have. I first started making these last fall for a craft swap that I hosted among Facebook friends. I needed a quick craft that cost under $5.00 to make for 16 people. I was able to make plenty of these in no time at all. I used a 2" lace and cut each strip to fit the diameter of my wrist. To make this bracelet, apply Fabric Stiffener like a paint on both sides and then wrap the lace around something round to dry. I ended up putting some on beer bottles and wrapping a rubber band around them for drying.
Thursday, November 1, 2012
Fall Yarn Letters
I'm almost too embarrassed to post these on here because they were so simple (and free!). Everyone has those wooden letters from craft stores and you could spend a small fortune buying up the alphabet. It dawned on me one day that I can make my own. I have yarn out the wahzoo (Did I spell that right? Is it even a word?) I cut letters out of amazon boxes at 12" tall and covered one side with glue. Then I wrapped yarn back and forth until the entire letter was covered. To keep the yarn in place while drying, I attached a paper clip. And that's it! Next time I'll aim for cutting straighter lines. ;) I consider these to be very abstract or freeform.
Sunday, October 28, 2012
Fall Fun Frame
Pardon the dorky alliteration... I just couldn't resist. My daughter and I had a great time making these acorn photo frames, inspired by the BHG acorn frame. We are fortunate (ha!) to live on a street lined with oak trees so there were many acorn caps to choose from.
You will need: Elmer's glue, acorn caps in various sizes, and a frame (We got ours at the Dollar Store)
Subscribe to:
Posts (Atom)


.jpg)

.jpg)
.jpg)


